|
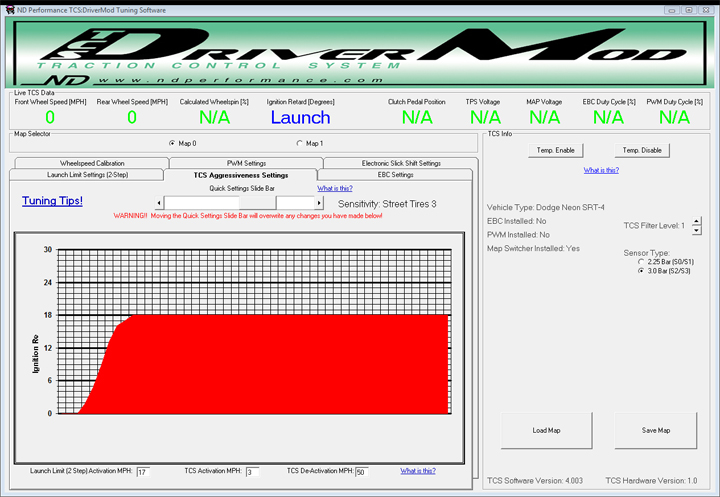
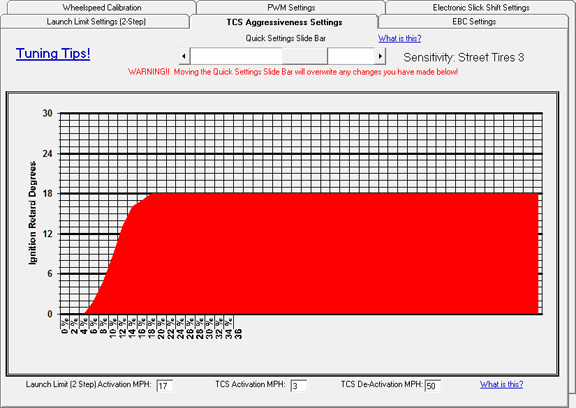
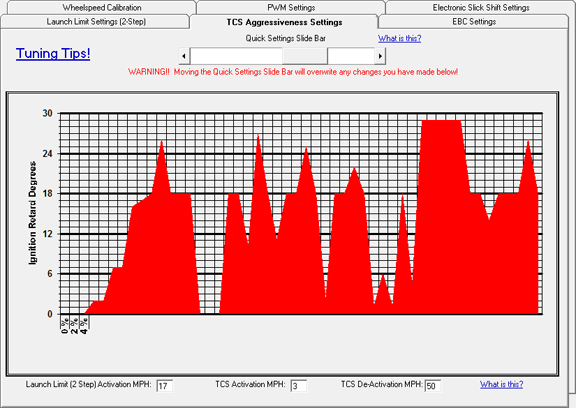
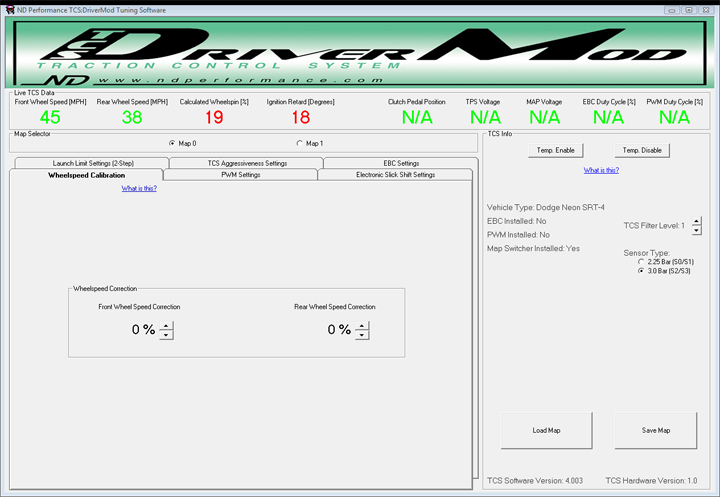
Tuning Tips! OK, so now you have the most revolutionary traction device you can buy for your car - how do you tune it? First, you need to download the latest version of the PC-based TCS tuning software from the SUPPORT page. Once you have installed it, to use it, TCS must be connected to your PC via a serial or a USB to Serial adapter cable. Your vehicle must be running to use the software! So, connect TCS to your computer, start the car, then start the ND Performance TCS Tuner software. When it starts, you will be greeted by this screen: Lots going on it this screen! Let's take it from the top. Of course you see the TCS: DriverMod logo, below that is the LiveTCS Data box. From left to right you see the current Front Wheel Speed (in MPH), Rear Wheel Speed, Calculated Wheelspin (in %), Ignition Retard (amount, or status, such as Launch or ESS), Clutch Pedal Position (only reads if ESS is enabled), TPS Voltage (only reads if ESS is enabled), MAP Voltage (not available at this time), EBC Duty Cycle (not available at this time), PWM Duty Cycle (not available at this time). Below the Live TCS Data Box, you see the Map Selector box with two "radio" buttons inside for Map 0 and Map 1. You may select these at any time. Once selected, all of the data you see on any of the tabs pertains to that selected Map. If Map 0 is selected, all of the data on all of the tabs or screens, is for Map 0 only. What does this mean? TCS has the capability of storing data for two complete TCS setups. This allows you to use the hardware Map Switcher to select between these two setups. This is useful for a number of things. If your car is strictly a street car, you may have a dry weather setup, and a wet or winter weather setup. If you take your car to the drag strip, you may have one setup for the street, and another for when you are running slicks. You can switch between these two setups or Maps, simply by selecting the 0/1 switch on the Map Switcher. At the right of the screen you will see the TCS Info box. This box serves many purposes. At the top, you will see two buttons. One is labeled Temp Enable and the other Temp Disable. In normal use, you will not use these, but, if for some reason your Map Switcher is disconnected for any reason, you can Enable or Disable the TCS by pressing either of these two buttons. If disabled, TCS will automatically re-enable the next time the vehicle is started. Below these two buttons is a series of information lines, telling you what vehicle this TCS box was designed for, and if various options have been installed, such as Map Switcher. You also see an area labeled TCS Filter Level. By default this is set to 1. However, if your vehicle is experiencing false 'triggering' of the TCS as you are driving, set this level progressively higher, until it is eliminated. Be aware, however, that raising this level makes TCS slightly slower to respond to real wheelspin events! Below this is a radio button for selecting which MAP sensor your vehicle is currently equipped with. If your car is stock, you probably have the factory 2.25Bar sensor. If you are running the Mopar Performance Stage 2 or Stage 3 kits, you should select 3.0 Bar. Nearer to the bottom, you will see the Load Map and Save Map buttons. These buttons allow you to save all of your settings for the CURRENT map selected (as shown on the Map Selector radio buttons), or to load a saved map up into those settings. This is very handy, and will allow you to store your settings for safe keeping, or share files with fellow TCS owners. One thing you need to be aware of is that when loading a .TCS file from disk, it will immediately overwrite all settings currently in your TCS for that map. Below the Load Map/Save Map buttons, the TCS box hardware and firmware versions are listed. OK, onto the main tabs. When you start the software, it will default to the TCS Aggressiveness Tab. It looks like this: Several things are going on here, but all are simple, once you know what they do. First you see the bright red graph. This is the 'curve' that TCS operates on. Notice that the X-axis is read in percent, which is the percentage of wheelspin. The Y-axis is Ignition Retard in degrees. The higher up the graph the red curve goes, the more ignition retard is applied for the given amount of wheelspin. At the very left of the graph, notice the empty space. It is right at 0-4% of wheelspin. This is not considered very much wheelspin, so no retard is applied. Now, this graph can be manipulated in several ways. First, notice the Quick Settings Slide Bar, above the graph. Adjusting this will give you a series of basic curves to start working from. Be aware that selecting a new curve from this Quick Settings Slide Bar will instantly overwrite the curve that is already in place. Use the Save Map button, and save your work often! OK, now select the graph you want. You can keep those settings, or you can tweak them by clicking anywhere in the graph area. Clicking above the curve will cause that part of the curve to "rise" to your mouse cursor. Clicking below it will lower the curve. So, randomly click on the graph, to try it out. You might end up with something like this: Now, this isn't anything close to an ideal curve, but it does show how much you can change the curve. But let's look at a real world change to the curve. Suppose you start with a basic curve, like the one above this example. You put it in your car, but when you launch, the car immediately falls on it's face, or there is a very noticeable "bog", then the car recovers. If this is the case, the TCS is trying to control wheelspin too aggressively at low wheel spin percentages. We need to 'relax' this control just a little bit, to give the car a chance to get going. In that case, we might reshape the curve to look a little more like this: Now, let's look at the numbers below the curve. If you have selected a basic curve from the Quick Settings Slide Bar, these numbers may be filled in for you, but you can change them. The Launch Limit (2 Step) Activation MPH is the speed below which the 2 Step Rev Limiter is active. TCS Activation MPH is the speed at which the traction control portion of the TCS is active. In other words, above this speed, the curve above is in effect. The last number is the TCS De-Activation MPH. Above this speed, TCS is not active. This is useful to prevent TCS from picking up electrical noise or a wheel wobble that would trigger it as you drive on a highway, or have gotten beyond the 'launch' portion of a 1/4 mile run. If you do not want TCS to ever be inactive, set this number to 191, which is its maximum value.
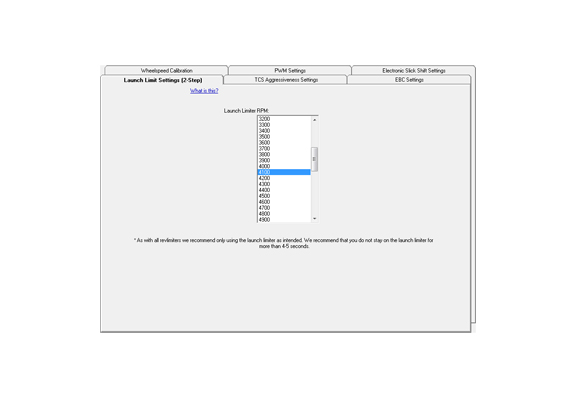
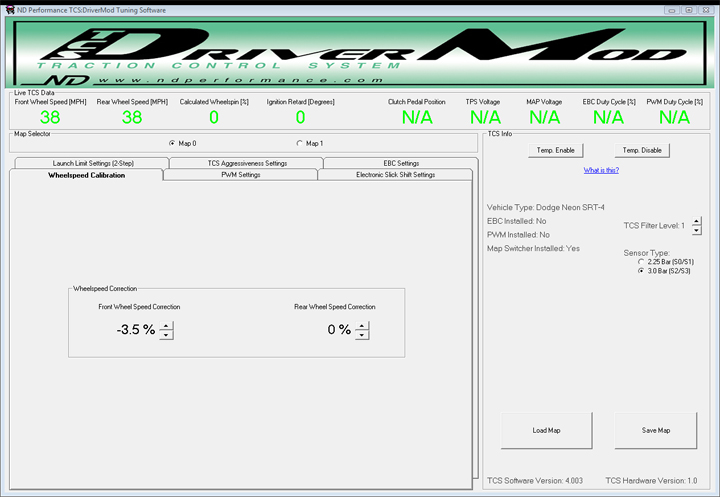
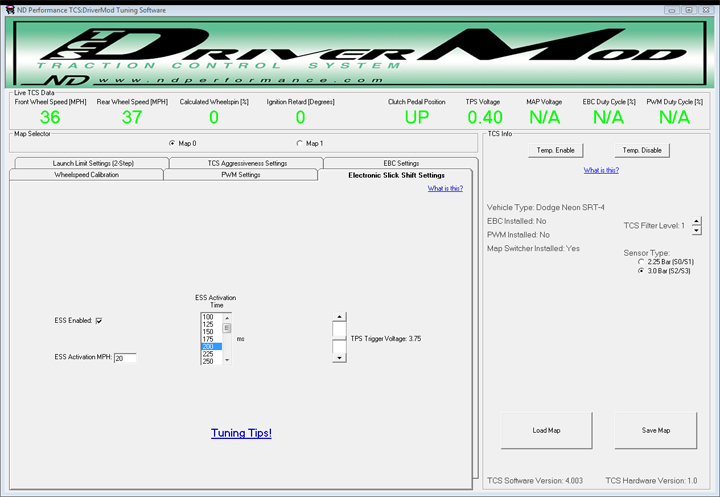
The next tab we will look at is the Launch Limit Settings (2 Step) tab. This is pretty straightforward. Go over to the list, select the RPM value for the 2 Step you are looking for. If you want the 2 Step to essentially be inactive, set the number well above what you will need. Next, let's take a look at the Wheelspeed Calibration tab. The purpose of this tab is to allow you to compensate for different sized wheels, front to back of the vehicle. TCS operates by measuring the speed difference of the front and rear wheels. Well, if you are running shorter tires (like drag slicks) in the front of the car than the rear, there will be a wheel speed difference, and TCS will not know that you are simply running different sized wheels. TCS is also calibrated for the stock sized wheels. If you are running larger or smaller wheels all the way around, it will not read the MPH data quite properly, although this in itself is not really a problem. Let's look at an example. You are going to go drag racing, and you put short slicks on the front of the car (FWD car). If you hook up a laptop, and go for a ride, look at the difference in the speeds that TCS is reading for the front and rear tires! Look again, TCS thinks you have wheel spin, and it is triggering! Uh oh! TCS reads 19% wheelspin, and it is applying 18° of ignition retard! Before you curse the TCS out, there is a fix. We know that the front wheels are smaller (shorter), so let's compensate a bit, and click on the two arrows next to the Front Wheel Speed Correction label. So, we now see that both wheels are reading 38 MPH in the Live TCS Data box, and all is happy. How did we figure out we needed -3.5%? This is pretty easy. Have an assistant drive the car at a steady speed, while you work the software on a laptop. Simply start clicking (slowly) the up or down buttons, until both numbers are brought into agreement. It's that easy! The Wheelspeed Calibration is independent for each map. You can set Map 0 to 0% Front and 0% Rear for the street, and set Map 1 to -3.5% and 0% for the track, or however you want to set it up. If you are running the same mismatched wheels under both maps, be sure the wheelspeed corrections are applied for each map. Now let's look at the Electronic Slick Shift (ESS) tab. ESS gives your car an exciting new WOT (wide open throttle) shifting capability. WOT shifting is the process (used mainly for drag racing) whereby you leave your right foot (accelerator) firmly on the floor (wide open throttle) at all times, including during a clutched shift. So, you launch, and make the whole drag race run without ever lifting your right foot. Doing this without ESS is especially hard on ALL of your driveline components. In some cases, the stress and load on the transmission is so much that it is actually impossible to do. However, if you have the ability to do it, 1/4 mile times drop drastically (up to .5 seconds in some cases). So how does it work? TCS is always reading the inputs it is given, including the clutch pedal position and the throttle position sensor. What it is looking for is a combination of four things. First, ESS has to be enabled (this is under your control). Second, the vehicle has to be traveling above a threshold speed. Third, the throttle position sensor (TPS) has to be indicating WOT. Fourth, the clutch pedal has to be pushed DOWN. When all of these conditions are met, TCS momentarilly 'cuts' the ignition, resulting in a very short interval where the engine is making no power. It is during this short amount of time that all stress is removed from the transmission, allowing a smooth, seamless shift. Once this time interval is up, ignition is re-applied, and the car goes on its merry way. This pays dividends on any car, but especially so for a turbocharged vehicle, where boost is no longer lost due to lifting your right foot during a shift. Here's what the ESS tab looks like: First off, you may notice that the Clutch Pedal Position and TPS Voltage indicators are working in the Live TCS Data box in this picture, when they were labeled N/A in previous pictures. That is because the ESS Enabled check box in the middle left of the tab is selected. That tells TCS you need to know that data. Below the ESS Enabled selection is ESS Activation MPH. Above this speed, ESS is active. We recommend setting this at 20MPH or higher. Now let's move over the right of the tab to the TPS Trigger Voltage. This is on a slide bar from 1.50 to 4.75 volts. What does that mean? This setting is the threshold of the throttle that TCS will treat as being WOT. In other words, if you select 3.00 volts, then anything the TCS sees as that voltage or higher will be considered WOT. So how do you set this properly? Simple. Hook up the laptop to the TCS, start the car, start the TCS Tuner software. Go to the ESS tab, and make sure ESS Enabled check box is checked. At idle, your TPS voltage is likely to be 0.30 - 0.95 volts, as indicated in the TCS Live Data box. Now, for a quick instant press the accelerator to wide open throttle, and observe the TPS Voltage indication (if you have already set your 2 Step rev limit value, and you have the Map Switcher selected to on, you can stay at WOT for 2-3 seconds). What did it read? Write that number down. Typical values for a Neon SRT-4 are around 3.85v. 4.70 volts for a Caliber SRT-4. Our test car (Neon SRT-4) reads 3.86v at WOT. The TPS Trigger Voltage setting should be set as close to the number you came up with, but not over it. So, our test car reads 3.86v at WOT, so we have 3.75 volts selected in the slide bar. If your Caliber SRT-4 reads 4.70v at WOT, select 4.50v. That wraps up the configurations that will likely not need any tuning. Let's step over to the tuning side, which all surrounds the box in the middle of the tab, ESS Activation Time. ESS Activation Time is the amount of time (in milliseconds) that the ignition is disabled during an ESS assisted WOT shift. This number will take some trial and error to arrive at. The only way to tune it is to set this to a relatively high number, like 400ms. Go out and try a WOT shift. When you WOT shift, you will see the red LED on the Map Switcher flash for a moment. If the ESS Activation Time is too long, you will make it through the shift, and the car will fall on its face, then pick up and go again. Lower the time in 25ms increments until you get it right where you want it - smooth, completely seamless WOT shifts. On our Neon SRT-4, that works out to 225ms. A customer's relatively stock 2005 Neon SRT-4 likes 250ms. This number will be different in different cars with different shifters, clutches and drivers. If you have made it to this point, SAVE YOUR MAP! TCS will almost never 'lose' a map, but having a backup of your work is always a good idea! Have fun and be safe!
|